Posts tonen met het label tips/ tutorials. Alle posts tonen

dinsdag 9 februari 2016

ATC video

Hi there !


Heb net een korte how-to video gepost op mijn YouTube Channel over het maken van deze ATC.
I just posted a how-to video on myYoutube Channel on making this ATC .
Have fun !
https://www.youtube.com/watch?v=d5UPsq_QhI8

xo Madeleine

maandag 2 september 2013

Mermaid's dream...


Hi all,

Zo'blij met mijn laatste tekening; ben heel happy met het resultaat!
Ik "draag 'm op" aan mijn jongste dochter; zij heeft (zoals veel meisjes denk ik..) al heel lang een grote droom om ooit eens te zwemmen met dolfijnen! Ik hoop dat-ie ooit uitkomt!

Só pleased to show you all my latest; I'm very happy with how it turned out!
I "dedicate" this one to my youngest daughter; one of her biggest dreams (like so many girls I guess...) is to one day swim with dolphins! I hope one day it will come true!

En aangezien ik vorige keer helemaal vergeten was om vorige keer foto's te maken van het hele proces, hier een hele serie 'how to':
Since I forgot last time to make pictures, here's a whole series of 'how to':

Eerst zoek je in je stapels naar foto's die je leuk vindt, die een verhaal vertellen:
Knip ze uit en plak ze op de juiste plek. Soms heb je niet het hele plaatje nodig; vaak is het zo dat een deel van de foto beter werkt ..
First you go thru your stacks & piles looking for pictures you like, that tell a story:
Cut them out & glue them in the right spot on your paper. Sometimes you don't need the whole picture; if you just use part of it, it sometimes works better.


Teken met potlood de meest belangrijke lijnen; zo verkrijg je ook al een goede balans in je tekening.
Ik kleur meestal mijn foto's en doedel eroverheen.
Draw the most important lines with pencil; it enables you to already get a good 'balance' in your drawing.
I mostly color my pictures & doodle over them.


Dan komt de volgende stap: beginnen met inkleuren ( ik gebruik Derwent Inktense pencils, maar het kan natuurlijk ook met gewone kleurpotloden of bijvoorbeeld waterverf)
Then comes the coloring ( I use Derwent Inktense pencils myself, but of course you can use any medium you like, f.e. colored pencils or watercolor paints..)


Vervolgens ga je alles 'versieren' met doodles/ zentangles en nog meer kleur.
Then you start to 'embellish' everything with more color and doodles/ zentangles.
You can also doodle some more over the pictures so they become really integrated in your drawing.


And more:

Till you're finished:

Hope you enjoyed my little 'tutorial'.

Makes lots of art every one & be happy!


vrijdag 8 juni 2012

3 nieuwe schilderijen/ 3 new paintings

Hi all,

Zon, regen, zon, regen, koud, warm.... 't weer is een beetje onbestendig, niet waar? En wat krijg je dan...zieke meiden! Jongste was thuis met soort keelontsteking, ging vervolgens weer te snel naar school (op zich goede instelling , hoor!) en is nu weer ziek thuis..Hmmmm, ik droom van zonnig Italië! De oudste was gelukkig snel weer op de been en gaat vanavond zelfs weer optreden! (yep, ben trotse moeder van een zingende dochter).

Ben druk bezig geweest afgelopen week met catering-werk én schilderen. Maar liefst 30x30cm schilderijen gemaakt. 
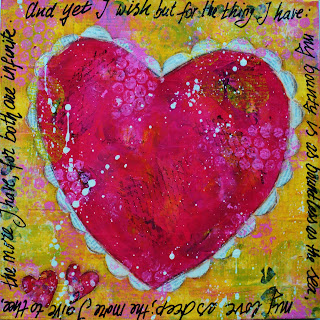
Het hart hierboven is gemaakt op ondergrond van pagina's uit Shakespeare's Romeo & Juliet. De quote op de rand is ook uit dat stuk.

Sun, rain, sun, rain, cold, hot....The weather has been a bit unsteady lately. And what happens then..? Girls sick at home. My youngest was home with a sort of laryngitis, went back to school to soon (which, in itself, is a good attitude of course!) and is now again sick at home....Mmmmm, I'm dreaming of a sunny Italy! My eldest luckily got well soon and is even performing tonight (yep, I'm a proud mum of a singing daughter!)

Been busy with catering ánd painting last week. I managed to make thrée 30x30 paintings. The heart painting above is made on a background of pages from Shakespeare's Romeo & Juliet. The quote is also from the play:

And yet I wish but for the thing I have,
my bounty is as boundless as the sea,
My love as deep, the more I give to thee,
the more I have , for both are infinite.


And these are the other two (about food.... again...):
Dan tot slot nog een fotoserie/ uitleg hoe ik het hart gemaakt heb. To end this post with: some photo's and explanation how I made the heart. Eerst heb ik een canvas board helemaal bedekt met stukjes papier (Shakespeare pagina's); gelijmd met gel medium. First I covered a canvas board with pieces of pages from Shakespeare's play. Eroverheen gestempeld/ put some stamps over it Beschilderd met 3 kleuren (wit, rose & geel) acrylverf; opgebracht mbv creditcard. Covered it with 3 colors (yellow, white, pink) acrylic paint, using a creditcard. Toen met rose een hart geschilderd. Then I painted a pink heart. Stukjes uit een tijdschirft gescheurd en opgeplakt in het hart. Hier en daar verf toegevoegd. Decorated the heart with pieces of torn magazine pics and used some more paint here and there. Making layers with paint.... Heb ook wat stukjes geverfd tissue paper gebruikt/ I also used some painted tissue paper. En heb het hart wat meer 'vorm'gegevenmet donkerder tinten rose. And I made the heart stand out more with darker shades of pink. Op het laatst nog wat stencils & stempels gebruikt, the rand om het hart gemaakt en de tekst toegevoegd. In the end I used some stencils & stamps here and there, made the border around the heart and added the text. Alvast een goed weekend allemaal en be happy!

vrijdag 30 maart 2012

Junk mail postcards

Hi,

Krijg je ook zoveel junkmail in je brievenbus? Gooi 't niet direct weg, maar doe er iets leuks mee, tijdens een gezellige middag met vriendinnen bijvoorbeeld....:
Do you also get that much junkmail in your mailbox? Don't throw it all away at once; use it for a fun project, having a nice afternoon with some friends...:

Neem een paar oude kartonnen dozen (bijv van cornflakes of hondekoekjes of zoiets..) Als het maar wel stevig karton is!
Take some old cardstock boxes (like from cornflakes, dog biscuits or whatever...)Be sure the cardstock is quite sturdy!


En gooi vervolgens de junkmail vd afgelopen week op tafel..
And throw all junkmail from last week on the table...


Knip en scheur er naar hartelust plaatjes of tekst uit
Cut and tear out images & text

Mbv een oude briefkaart als mal knip/ snijd je briefkaarten uit het karton
Use an old postcard for cutting/ carving postcards out of your cardstock


Maak een hele stapel/ Just make a whole pile of them!

Nu begint het leuke werk: plak de briefkaarten vol met leuke plaatjes & teksten. Je kunt bijvoorbeeld alleen maar teksten opplakken of gaan voor 1 bepaalde kleur, of een thema (Pasen...)
Dan kun je de boel naturrlijk nog versieren met krijtjes/ stiften/ stempels, de mogelijkheden zijn eindeloos!
Now the fun work start: paste fun images & texts on your postcards. You can use f.e. only text, or make monochrome cards, or use a theme (like Easter..)
Then of course you can embellish your cards further, using stamps, crayons, felt tips; endless possibilities!


And you'll end up with a whole bunch of fun cards!

Have fun and be happy!

zondag 1 januari 2012

Making a background...

HAPPY NEW YEAR TO ALL !!!!!!!

Hi,

Nou, daar gaat-ie dan... eerste bericht in 2011: een tutorial over het maken van een leuke achtergrond:
Well, here goes... first entry in 2012; a tutorial about making a nice background:

1) bedek je drager (in dit geval heb ik een canvas board gebruikt) met stukjes papier, gescheurd uit een oud tijdschrift of junkmail
Cover your canvas/paper (here I used a canvas board) with pieces of paper, torn from old magazines or junk mail

2) bedek deze met een dunne laag gesso. Cover these with a thin layer of gesso

3) hieroverheen ga je stempelen en/of schrijven; hier heb ik een kurk gebruikt en handgemaakte stempels en wat tekst
Write and/or stamp over this layer; here I used a cork & handmade stamps & I did some writing

4) dan komt er een dunne laag (verdunde) acrylverf overheen,in een kleur die je mooi vindt. Then make a thin layer of acrylic paint, in a color you like:

5) voeg nog meer laagjes kleuren toe; hier heb ik diverse kleuren acrylverf gebruikt, gestempeld met bubble wrap
Add more color layers; here I used several colors acrylic paint, bubble wrap for stamping

En vervolgens heb je een mooie achtergrond, opgebouwd uit een heleboel laagjes. And then you have a nice layered background.

Be happy!

donderdag 13 oktober 2011

Verfrestjes? / Paint leftovers?

Hi,

Nog even een kleine tip ivm verfrestjes (jeweetwel, je bent bezig met schilderen en hup, daar heb je weer teveel verf uit de tube geknepen..)

Ik heb altijd een paar tissues naast me liggen waar ik de verfrestjes op uitsmeer, en m'n kwast aan afveeg; zo bouw je vanzelf een stapel geverfd tissue papier op. En dit is ideaal om bijvoorbeeld collages mee te maken!

Nog een idee: houd een stapeltje witte papiertjes bij de hand, om hier je verfresten op uit te smeren. Met deze "paint-blots" kun je weer hele grappige tekeningen maken.
Dit is een idee uit het (geweldig leuke!!) boek "Drawing Lab" van Carla Sonheim. Heb 't net gekocht en ben er helemaal weg van! Wat staan hier een leuke teken-ideeën in, echt een aanrader!

Painted tissue paper:
A little tip regarding leftover paint (you know, you're busy painting and ooh, there you squeezed too much paint from the tube ..)

I always have a couple of tissues that I use for wiping my brush & put on all the leftover paint; so you automatically build a stack of colored tissue paper. Which you can use perfectly for collages!

Another idea: keep a stack of white papers on hand, to put you paint leftovers on. These "paint blots" you can use for making very funny drawings.
This is an idea from the (great fun!) book "Drawing Lab" by Carla Sonheim. I just bought it and am very pleased with it! So many great drawing ideas, love it!

Paint-blots:

zondag 4 september 2011

How to: another reverse glass painting

Hallo,

Ben druk bezig geweest met nog een glas-schilderij. Heb er eigenlijk nog geen goed nederlands woord voor gevonden (een "op-de-achterkant-van-het-glas-gemaakt-schilderij".....) Wel duits: hinterglasmalerei en engels dus: reverse glass painting.
Vond het wel leuk om te laten zien, hoe ik het schilderij heb opgebouwd..:
Hi,
I've been quite busy making another glass painting. Thought it would be nice to show you how I build it up...
Eerst de lijnen & details./ First you make the lines & fine details

Vervolgens de kleuren die daar achter komen:
Then you paint the colors right behind that:
Dan volgen de wat grotere kleurvlakken:
Then some more background colors:

Vervolgens de achtergond (waarbij je hier dus bijna niets meer ziet van de details!):
This comes last: the total bakcground (and here you see almost nothing anymore of all the details)

En dan draai je het schilderij om en tada...!
The, when everything is finished, you turn the glass panel around and tada..!

Be happy!

woensdag 6 april 2011

Mini 'tutorial'...

Vorige week deze "Paas-kip" gemaakt.
Last week I made this 'Easter-chicken':

En zo is het opgebouwd:
This is how it was made:

Op een wit vel stevig papier (24x30cm) een soort 'collage' gemaakt van gescheurde tijdschriftfoto's.
On a white piece of paper (24x30cm) I collaged torn magazine photographs

Volgende stap: een laagje gesso eroverheen.
Next step: a layer of gesso

Met verdunde acrylverf eerst een laagje geel, toen lichtgroen, toen donkergroen (met kwast en paletmes). Daaroverheen wat gedoodled met witte gelpen.
With thinned acrylic paint I put on a layer of yellow paint, then lightgreen, then darkgreen (with brush and palet knife). I doodled over it with white gelpen.

Van handbeschilderd tissue papier (jeweetwel, waar je serviesgoed in verpakt..) lange repen geknipt & opgeplakt. Hieroverheen weer gedoodled met Neocolor krijt & gelpen...
I cut long strokes of handpainted tissue paper en glued them on. Over that I doodled again with Neocolor crayons & gelpen...

En als laatste: van krantenpapier een kip geknipt, gesso erover.. Van beschilderde tissues (jawel, gewone 'zakdoekjes'..) de snavel, staart etc. & bloemen geknipt. De vlinders komen uit een tijdschrift.
Hier en daar nog wat bijgewerkt met krijt en.... tada!! Klaar!
Last bit: cut out a chicken from a newspaper, gessoed over it... Of handpainted tissue paper I made the beak, tail etc. & flowers. Butterflies are from a magazine. Worked some more here and there with the crayons and tada... ready!!

Be happy!